In Hunter’s Notes, Chris Ingersoll aims to provide the insight and advice needed to understand the ins and outs of Monster Hunter and become immersed in its world. For more, check out the archive.
Hopefully by now you’ve developed the skills you need to more efficiently take down the large monsters, like learning tells and knowing when to get in hits and when to run away. It’s all down to observation and practice, but there are other skills you can pick up to give you an edge. Have you talked to the Wyverian Blacksmith lately? This diminutive man is an invaluable resource, and really probably the most important member of Moga Village as far as you’re concerned. His ability to turn various monster carves, ores and whatnot into different weapons, armor, and decorations is crucial. Without a decent weapon, you won’t do enough damage, and of course without decent armor you’ll be taking far more damage than you probably want to. But armor has more uses than just being a barrier between you and sudden death.
Set ‘em up
If you like to be prepared for anything, check the “Equip Sets” option at your room’s item box. Here you can save your current equipment arrangement, including decorations, for future use. If you have an anti-fire set and an anti-ice set, you can set both of them up and swap between them as needed. Anything you can do to speed up the process and get back to hunting is essential!
First of all, armor created from a monster’s hide has the same properties as the actual hide. Even if you don’t actually make the armor, you can take a look at its properties to get hints as to that specific monster’s strengths and weaknesses. For example, wearing Jaggi Hide armor increases your vulnerability to fire damage because Jaggis themselves are more vulnerable to fire, so if you have a weapon with fire elemental properties it might be a good idea to use it against them. The trick is that you often can’t access a piece of armor without having a specific one of its ingredients, so you’ll probably have to face the monster without that knowledge at least once.
More important, however, are the armor’s innate skills. Every piece contributes points towards a specific skill, like “Stun +2”. If you assemble pieces whose skills total +10 or more, you get the corresponding skill, like “Halve Stun,” as long as you wear them. Some skills have further thresholds; “Halve Stun” becomes “Negate Stun” if you get +15, for instance. On the flip side, many skills also have corresponding penalties if you have -10 or fewer points. You don’t want any part of “Double Stun,” I assure you.
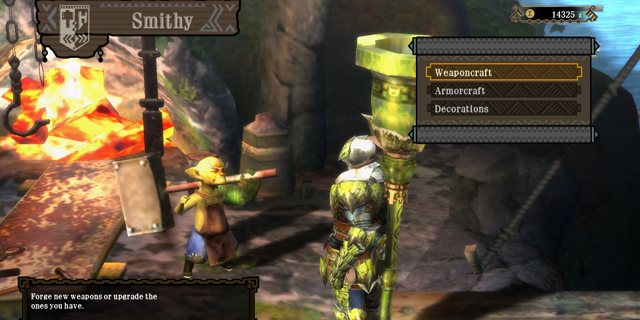
Fortunately these thresholds are all-or-nothing, and that’s where decorations come in. Many pieces of armor — and even several weapons and charms — have one or more open slots in which you can attach various decorations to boost up your skill points. If your armor provides -10 points to a skill, a decoration that bestows even +1 in that same skill will be enough to keep you away from the -10 threshold and avoid the corresponding penalty. This works in the other direction as well. A full Jaggi set carries Attack +13, but add two more points and you’ll graduate from “Attack Up (S)” to “Attack Up (M)”. Most often a given decoration will bestow points to one skill while taking points away from another, so you have to balance your options.
Careful use of decorations can even provide bonus skills. For example, are you having trouble capturing monsters? The Bone armor set comes with points towards “Perception,” which bestows the skill “Capture Guru” once you get +10. If you have Capture Guru and hit a large monster with a Paintball, the monster’s map icon will blink when it is ready to be captured. This will happen before the monster gives the tell-tale sign of limping away, and can save you valuable time when looking to take a beast alive. However, what if you don’t want to use the Bone set? What if you like your Qurupeco armor? As it turns out, Qurupeco armor has five slots, and every Perception Jewel grants +2. Slot in five gems, and suddenly you’ve added Capture Guru to your arsenal of tricks without needing to change armor!
Awkward interface is awkward
The interface for taking charms is a little unintuitive at first. You must select “send to box,” then select the charm(s) or other items you want to send (they will become highlighted), then select the “Send Items” option underneath the charms to actually execute the action. Then you can back out and sell the undesired ones if you want. You’ll get used to it, but it might take one or two tries.
Obviously this doesn’t work every time, especially while you are still a low-ranked hunter. Not every set will have five slots available (Jaggi only has three, for example), and you might want to use what few slots you have to “gem out” a penalty skill instead. Is there another way? Well… maybe. That will depend on what charms you have available, if any.

A charm is an object you pick up during a quest, often from mining. At the end of a quest, the charm will be identified and you can either send it to your box or sell it. Charms give you no defensive benefit and exist solely to provide skill points. If you somehow found a charm that granted Perception +4, you could use it and your three slots to have Capture Guru on your Jaggi Armor. Many charms have two skills, although some just have one and not all of the two-skill charms are both positive. Also, as you advance in hunter rank the number of slots available on your armor increases (usually, it varies by set), although you do have to forge new sets to get them — you can’t just upgrade your lower-rank set with Armor Spheres — which can be a pain. Having more slots also allows you to use more powerful decorations. For example, a level 1 Antidote Jewel has Poison +1 and Stun -1. A level 2 Antidote Jewel has Poison +3 and still only Stun -1, but takes up two slots (which have to be on the same piece of equipment).
A charmed life?
The charms available to your hunter are determined randomly from one of over a dozen potential tables, but the specific table your hunter draws from is locked at character creation. There are online tools to find out what table you’re stuck with if you want to know, but as long as it isn’t “cursed” you should be fine. Your enjoyment of the game will not be lessened by a poor charm table, but rather a good one will simply give you more and better options.
There is one other type of skill out there: food skills. Once the canteen opens, you can (and really should) eat a meal before each hunt. Mixing different ingredients with various methods of cooking can bestow you different skills as well as bonuses to health, stamina, and other factors. Some combinations have fixed skills that they will always (potentially) provide, and the effects of others vary from day to day. Experiment to see what a good meal can offer you! Fresher ingredients have a better chance of providing skills, and higher-level (starred) ingredients give larger bonuses. Just bear in mind that should you faint on a quest, you will lose the non-skill benefits of your meal.
Any edge you can give yourself is one that will help you survive out there. And the best edge? Is not hunting alone. Soon it’ll be time to get out and meet new people… or something like that. But we’ll get to that next week.